
We’re pleased to announce version of 5 of Snugg Pro!
It’s been a long time coming and we’re super excited to release this major enhancement to our platform. This new release is effective immediately and will take place as soon as you load Snugg Pro or refresh the browser if you’re already in it. Please take the time to read through this email with explanations of how all of the new features work. If you only read one thing, please read the first section on our new data entry system for HVAC systems.
Here’s a quick list of all of the improvements with detailed descriptions and screenshots below:
- New HVAC Interface
- Limited Offline Support
- Job Stages
- Faster Enhanced User Interface
- Sortable Report Pages and Page Elements
- Net Savings and SIR without Line Item Savings and SIR
- CAZ Inputs for BPI Compliance (HPXML output only)
- Enhanced Modeling Validation
- Faster Photo Uploading
- Improved Pagination on Report
- Recommendation Sort Order Stored in Templates
- Default Thermostat Setpoint Ranges
- Oven Fuel Type (added for CAZ)
The following are features that are NOT included in this release but will come out shortly hereafter:
- ASHRAE 62.2 calculations
- Home Energy Score
- More Offline Capabilities
- CAZ Results in Report
Quick note: If you go to v4.snuggpro.com, you’ll automatically be taken to the new version. For folks who still need access to jobs in version 3, please contact support for more information.
Here is a description of all of the improvements as well as links to videos that explain how to use all of the new features.
New HVAC Interface
Our interface for HVAC systems in V4 was fine for simple HVAC upgrades where you’re just swapping out a single box, or upgrading the AC unit. But for more complex systems such as heat pumps (since they do both heating and cooling), or improvements like fuel switching or the addition of duct systems, our interface was difficult to use. We have completely revamped the way we talk about HVAC systems and we’re pretty sure you’re going to love it!
Here’s how it works. Navigate to the HVAC section and click on Add an HVAC System. The pop-up window that opens asks you a few new questions. The first step is to name your system. Give it a name that you can use to easily differentiate it from the others like: Old Heat Pump or Basement Furnace.
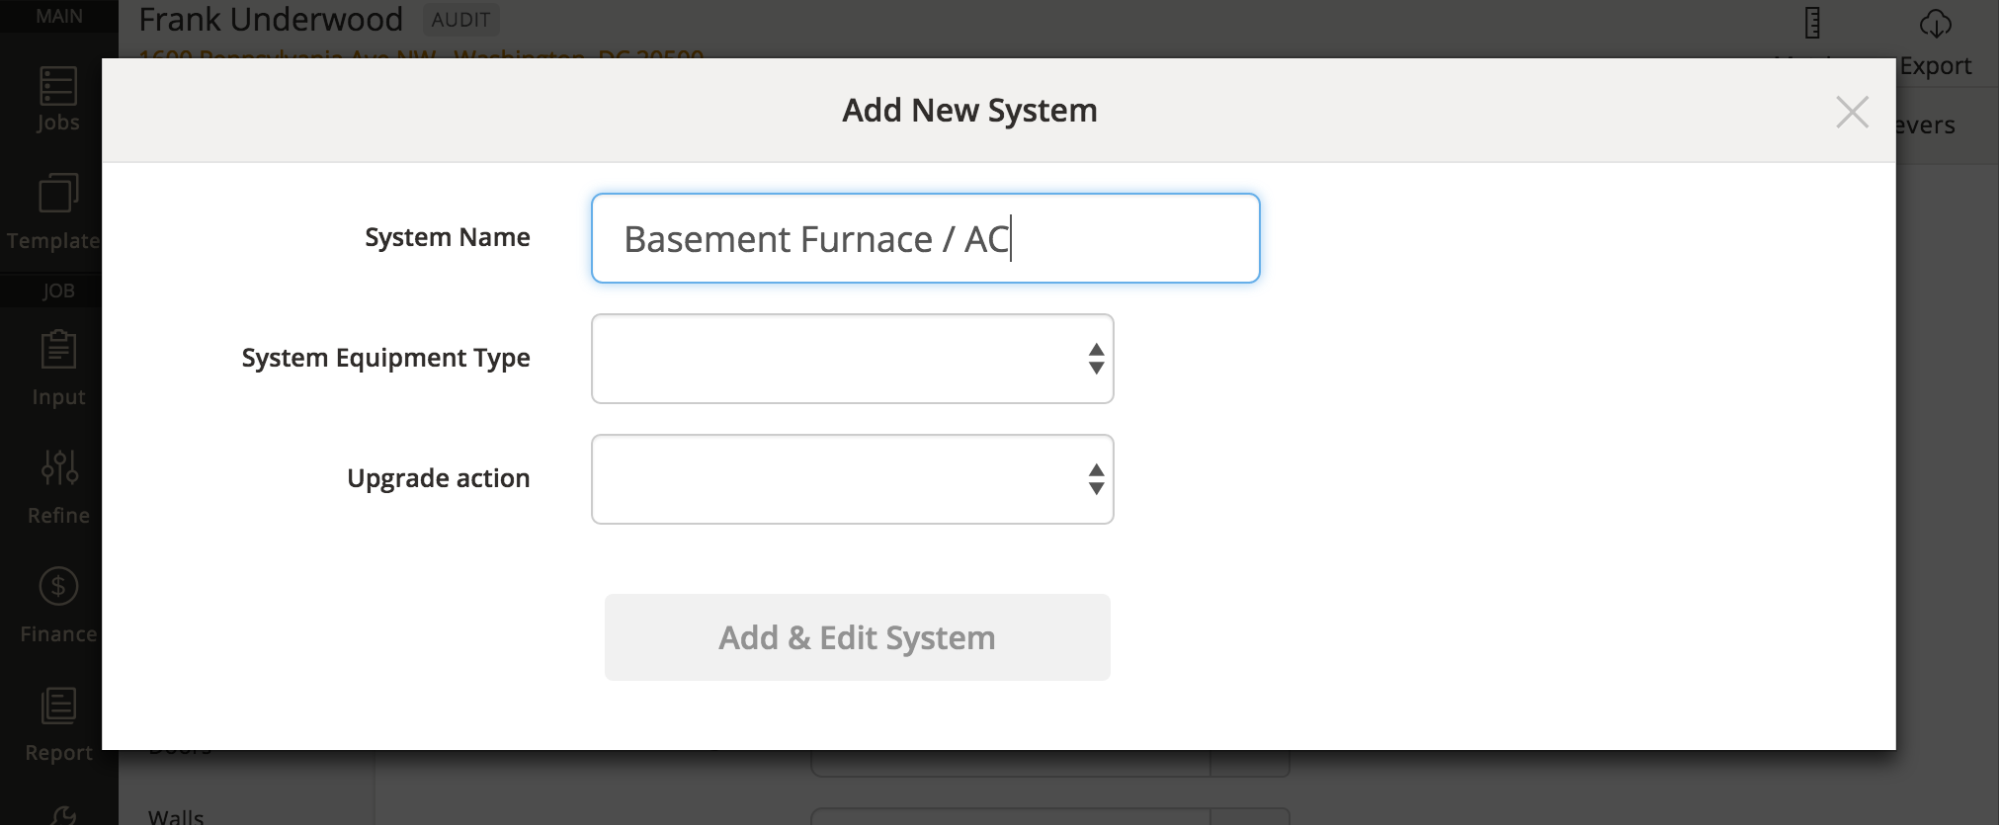
Then, select the System Equipment Type. This list shows every possible type of heating or cooling system (or combination thereof) that is available in our software. Pay attention to the “shared ducts” vs. “standalone ducts” component… it’s very similar to the “Both” option that you used to have in V4.

Now, you get to choose what’s actually going to happen with the system you’re describing. There are four actions you can take on the system you’ve described:
- Replace with a newer model — Choose this when you want to replace the existing equipment with a new version of the same thing. Eg. replace a 78 AFUE furnace with a new 98 AFUE furnace, or an old room AC with a new room AC.
- Keep an existing system as is — Choose this if you’re not going to do anything to a system or you might just change the % of total load that that old system covers in the house.
- Remove a system permanently — This is where you plan to rip out an entire system and replace it with something totally new, like going from a direct heater and room AC to a central heat pump. In this instance you’ll have a system that’s described on the base side, and the improved side will be blank. When you choose this option, you’ll build another totally separate HVAC system and choose the last option for it (Install a new non-existing system).
- Install a new non-existing system — This is where you’ll describe a brand new system that will be replacing the system you got rid of when you chose “Remove a system permanently”.

Once you have chosen the appropriate settings, click on Add and Edit System and then you will see all of the relevant fields based on your choices above.
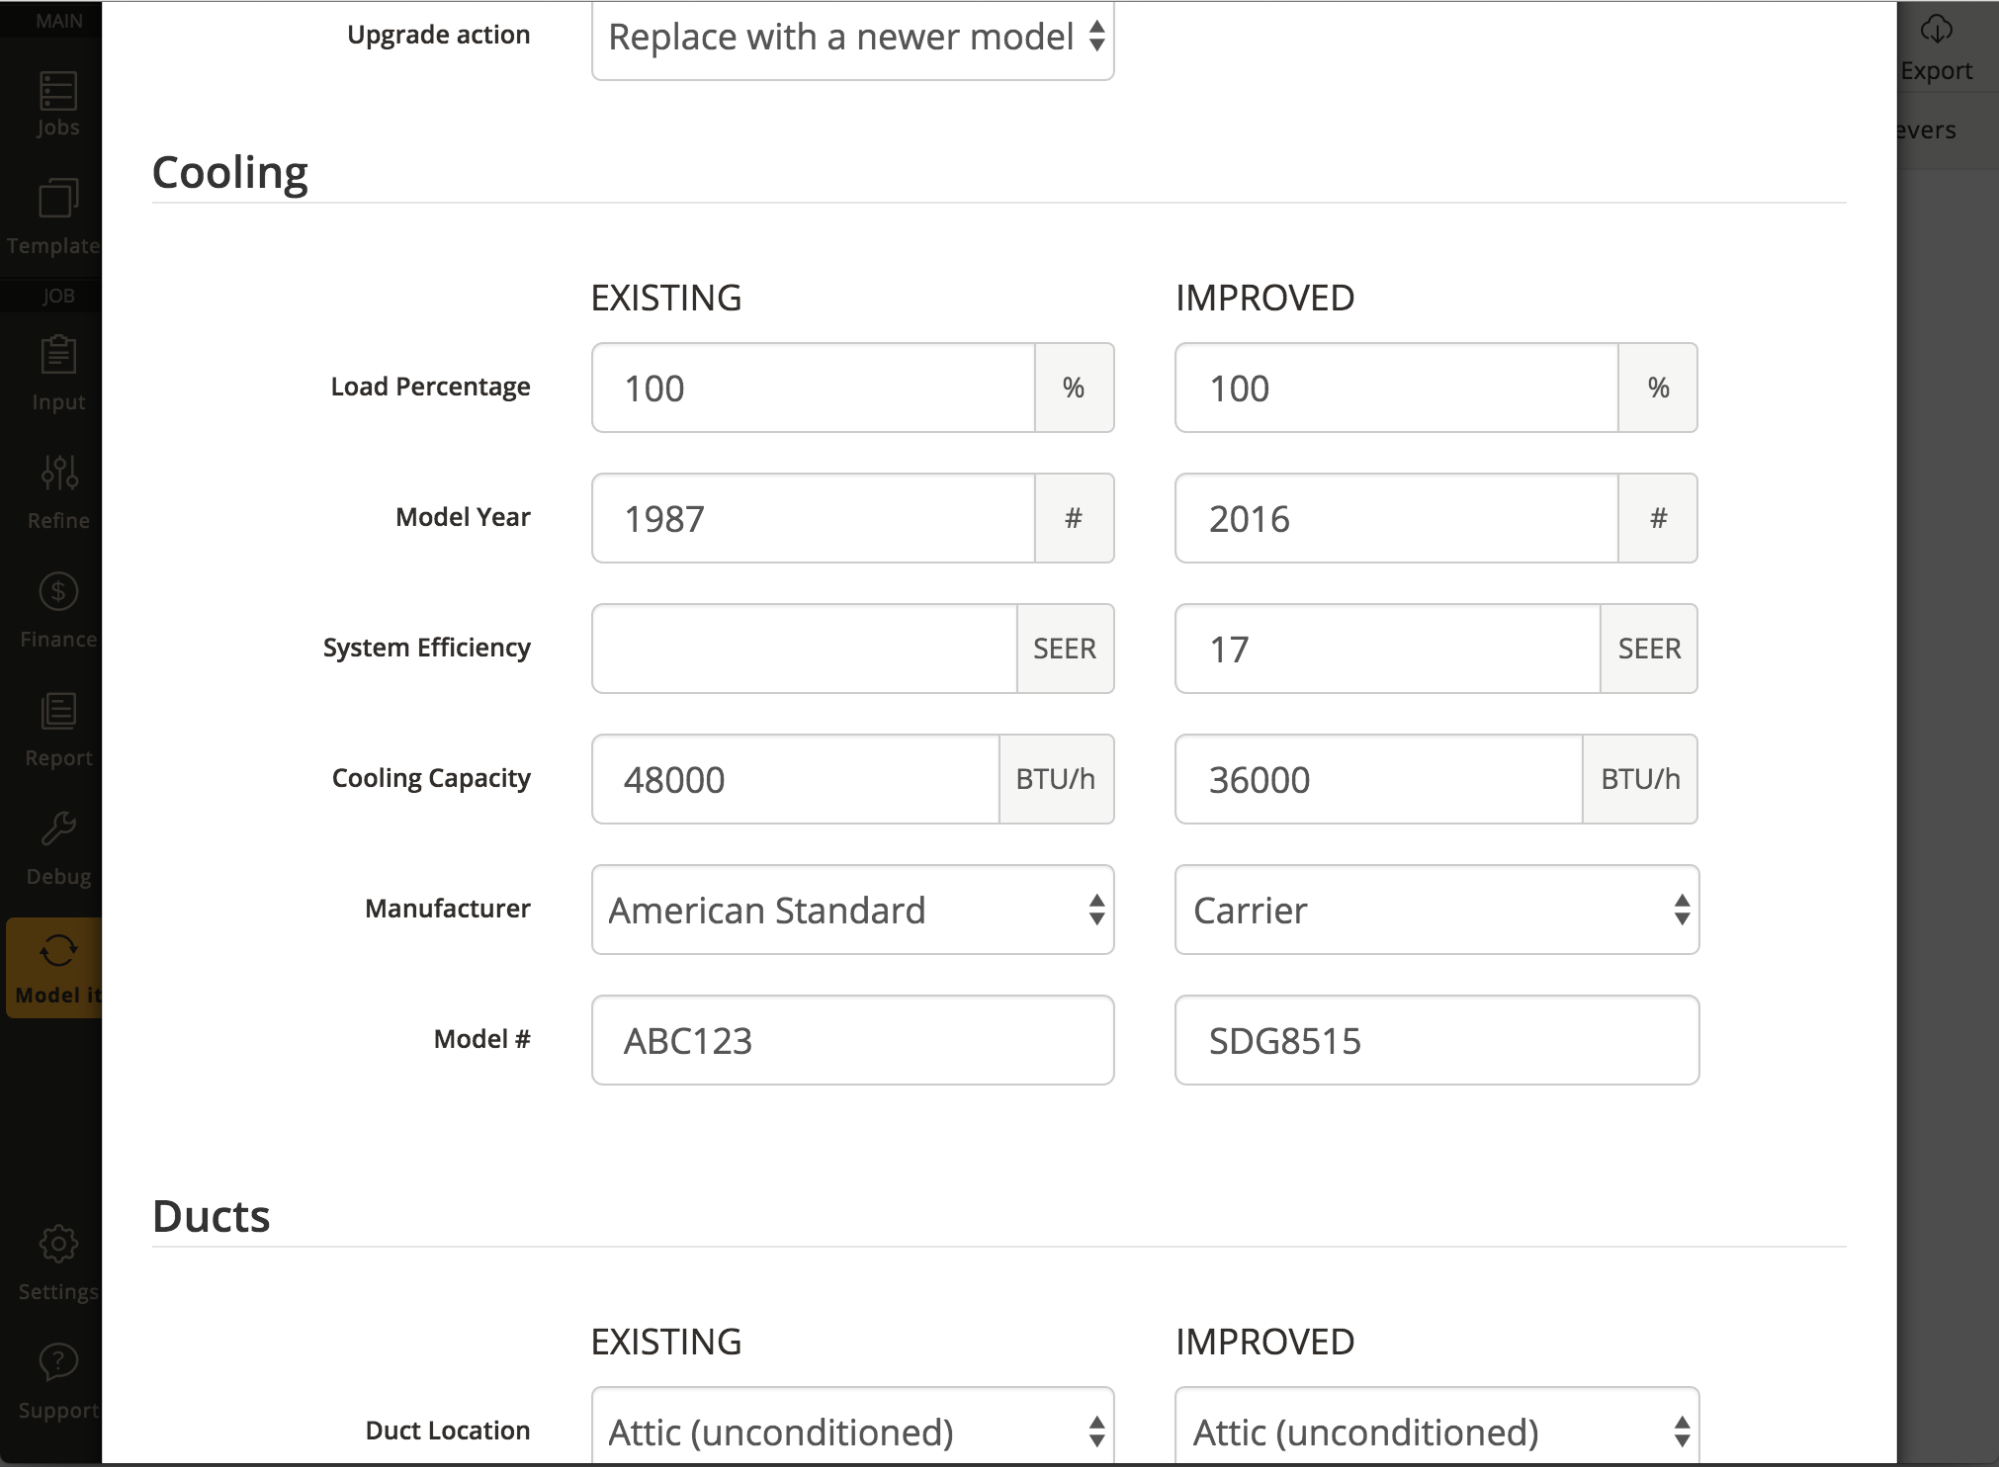
Notice that we no longer have a field for the age range of the heating and cooling equipment. We have taken advantage of the Model Year to now determine the age of the equipment. Most equipment displays the year it was built on the nameplate of the appliance. Use this to enter the year the equipment was built. We will now use the Model Year to determine the relative efficiency of the equipment. Unless you truly know the aged efficiency of the base system, please do not fill out the System Efficiency yourself. It will be determined after modeling.
Note: We did our very best to migrate the HVAC systems from V4 to our new setup in V5. In some rare cases where very complicated systems were not described correctly in V4, the migration may not have represented these perfectly. Please find us on support if you think your new job isn’t quite what you were looking for and we’ll help you sort it out.
If you want to see a 15-minute screencast of the new HVAC UI, watch below:
Offline Support
We can now support certain aspects of working off line in Snugg Pro. If you already have a job open and you loose internet connection, you will see an alert at the bottom of the screen that says

You may safely make changes to your job while this alert is active on the screen as long as you DO NOT close your browser window or refresh the page. Once you reconnect to the internet, you’ll see this alert:

At this point, all of the changes you have just made have been successfully saved to the server and it is now safe for you to close your browser window, refresh, or quit your browser.
You cannot open a new job when you are offline, model the job, or upload photos.
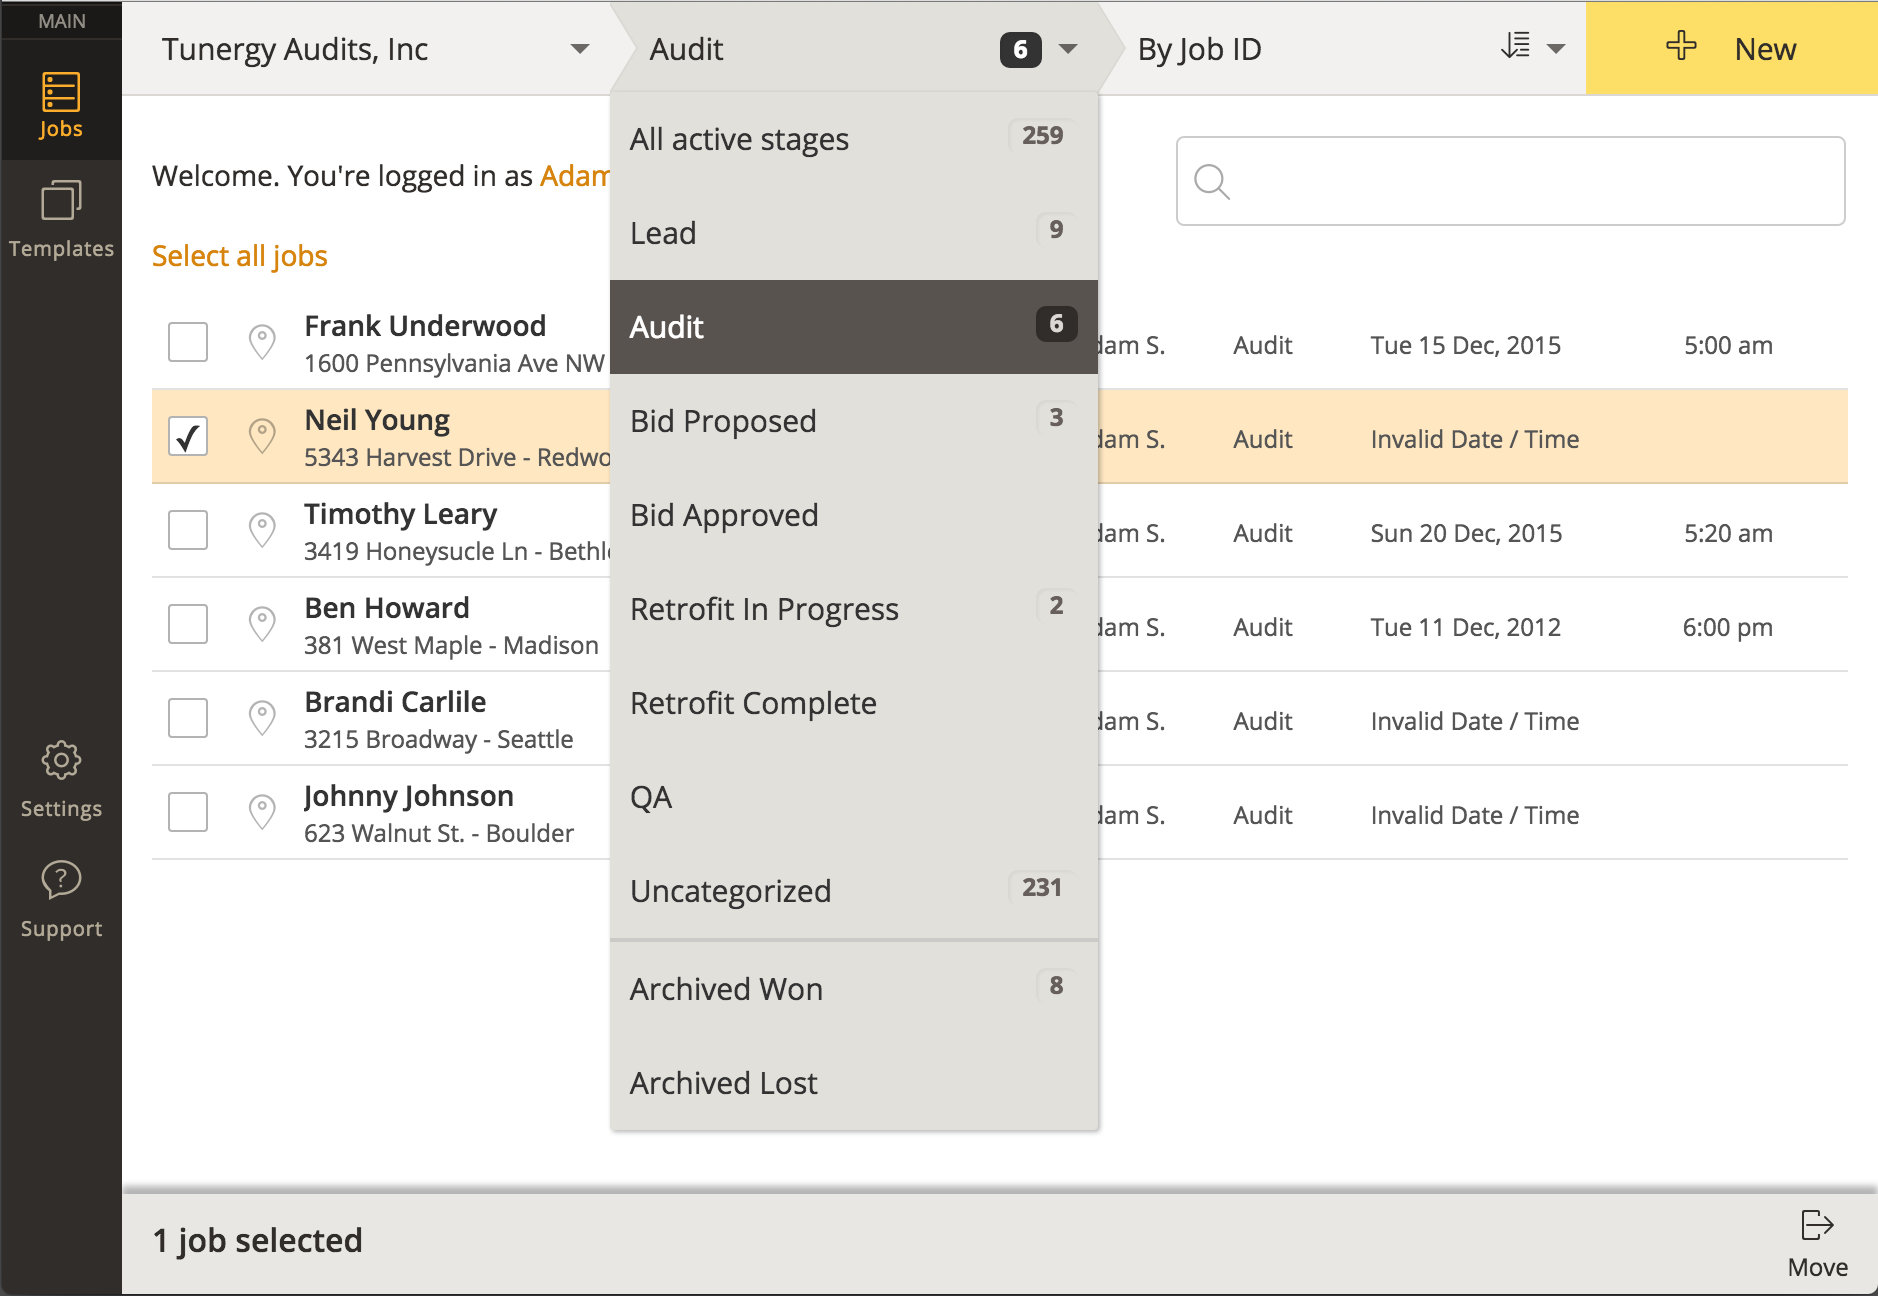
Job Stages
Stages allow you to categorize your jobs. You can mark the job as a Lead, Audit, Bid Proposed, Bid Approved, Retrofit In Progress, Retrofit Complete, QA, Uncategorized, Archived Won, and Archived Lost. We could give you an explanation of what these are all intended to represent, but for the most part they’re open to any interpretation your company would like to use for them. This allows you to categorize jobs and then filter and sort by the different stages. For instance, you can view just the jobs that are Leads, or filter out any jobs that are completed (Archived).
To move a job from one stage to the next, you can click the checkbox next to the job or jobs you want to move. Once you do this, the “Move ->” icon will be displayed at the bottom of the page. Click on this icon and you’ll see a list of the jobs you selected along with a drop down menu to choose which stage you’d like to move the job to. If you’re inside a single job and want to move it, just click on the Homeowner’s Name at the top left of the screen and then click on Settings. You can then pick the stage of this job from the drop down menu.
For contractors who are submitting HPXML files to a government or utility program, there are a few simple rules.
- The 'Audit' HPXML file is the appropriate file to download for the following stages: Lead, Audit, Bid Proposed, Bid Approved, and Uncategorized
- The 'Retrofit' HPXML file is the appropriate file to download for the stage 'Retrofit Complete' or 'QA'. You must make sure that the job is in the correct stage before you can download a Retrofit xml report.
Watch this 2-minute screencast about stages:
Enhanced User Interface
Many improvements have been made to the user interface. You’ll now see the sub-navigation for both the Input screen and Refine screen show up on the left hand side next to the primary navigation. As you scroll through the input screen, you’ll see the header display what section you’re currently on.
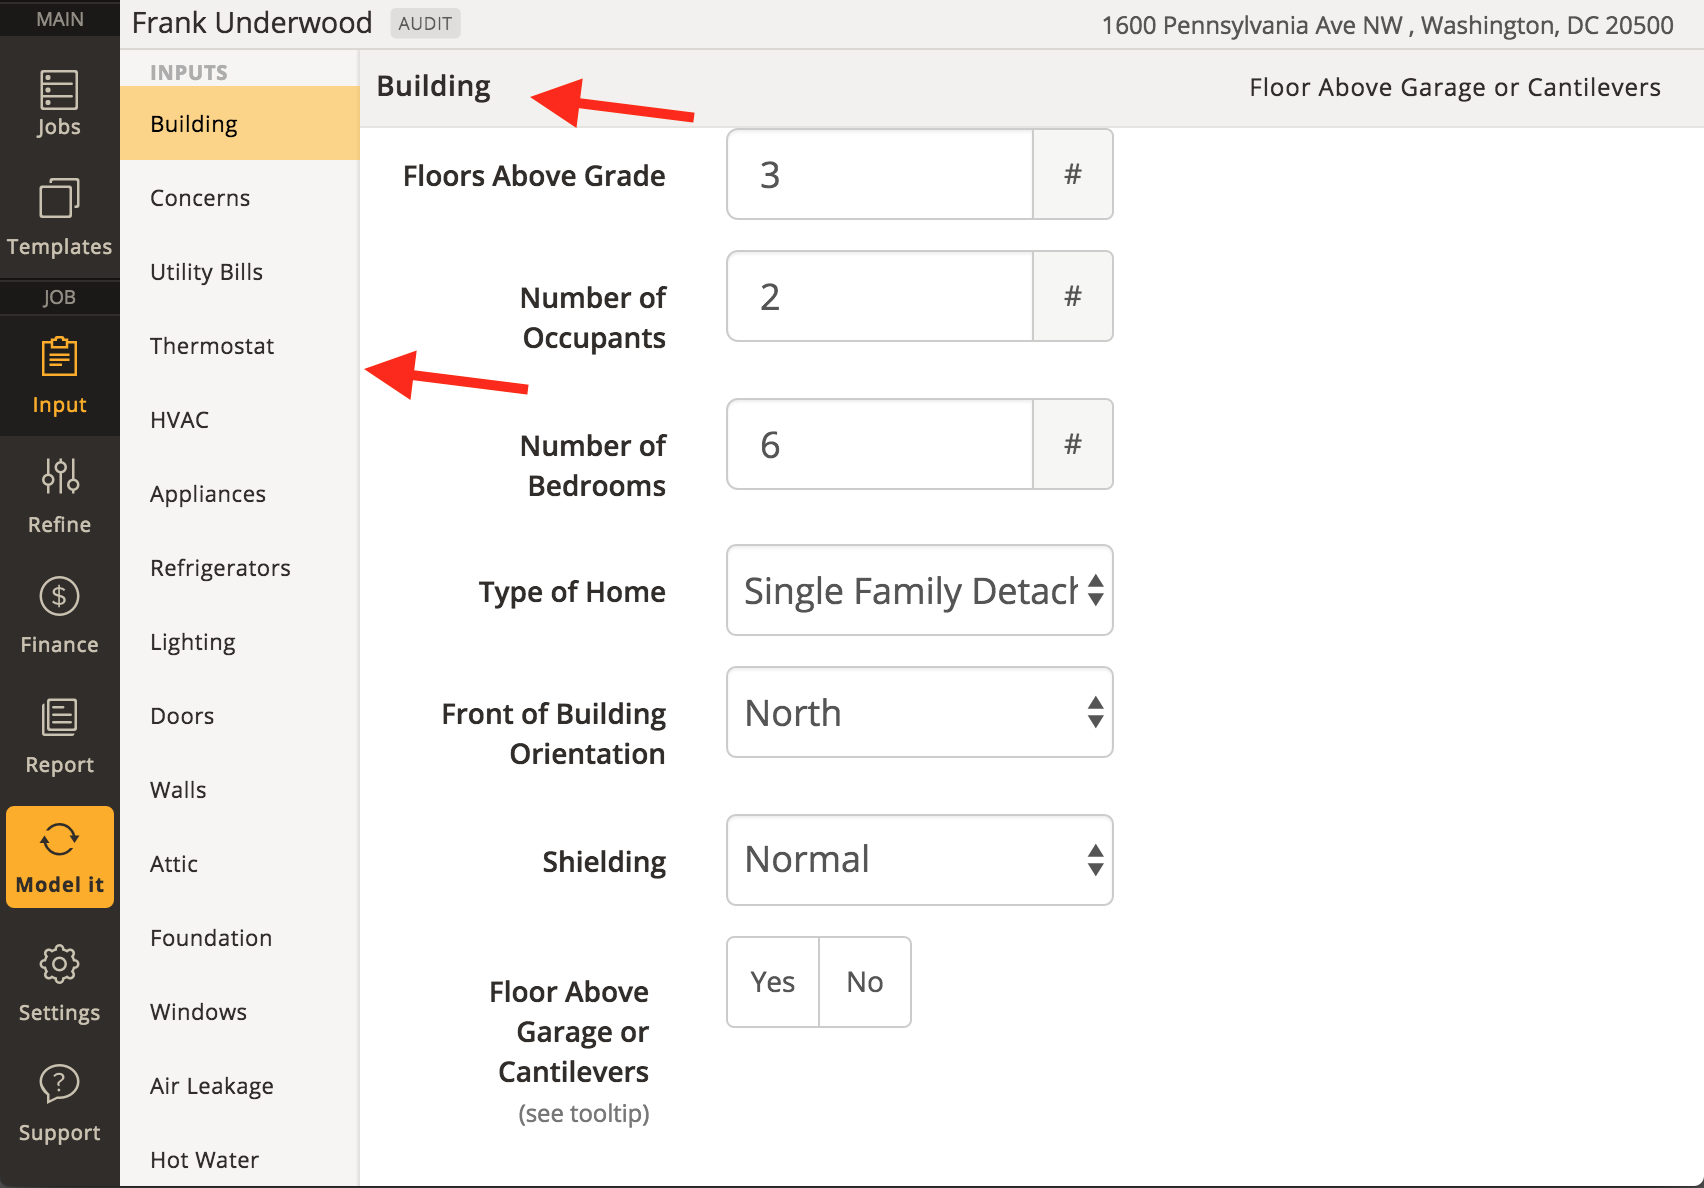
Additionally, when you move back and forth between the screens, Snugg Pro remembers your vertical position and takes you there automatically. This saves valuable time on long screens like the input screen and the report screen.
The other major change in the layout are the simple inputs and details for each section on the input screen. The default view is still of the standard simple “Input Fields”. To get to the detailed inputs (access to notes, photos, and base/improved values) for a section you click on the appropriately labeled button for that section which has moved to the right of the screen in the section header.
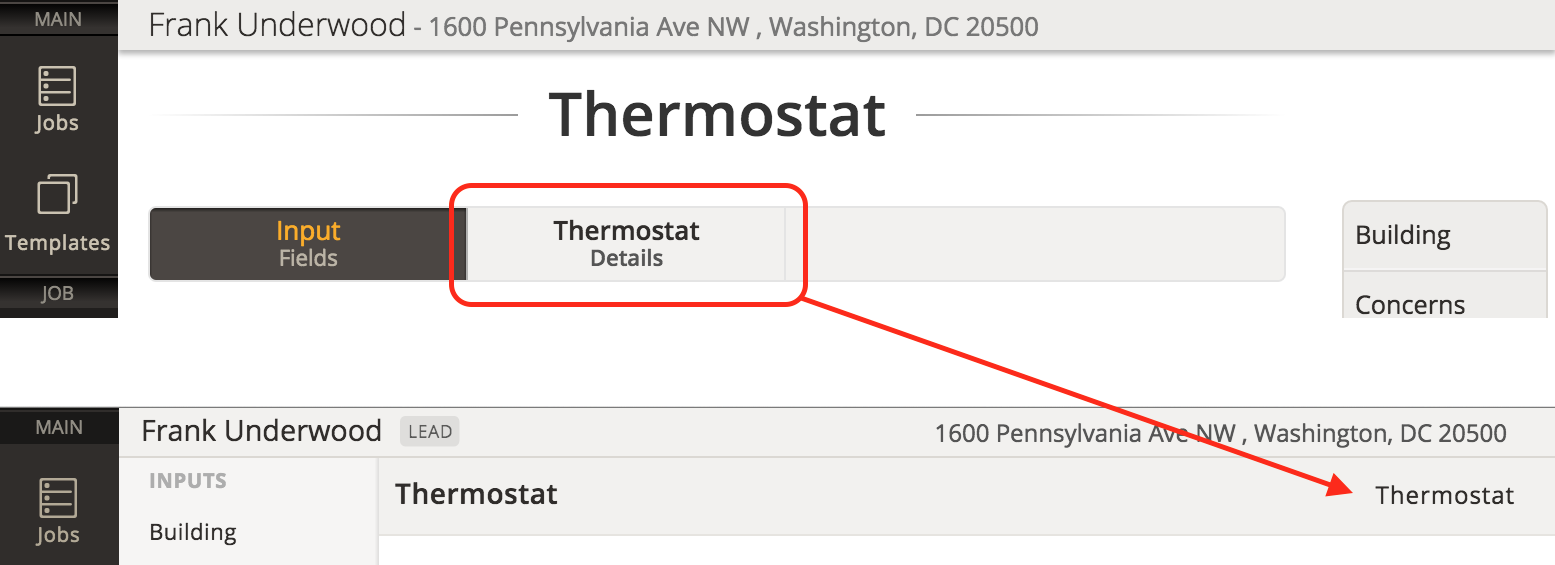
Once you click on this, a window pops up for you to enter all of the relevant details. To go back to the main input screen, you may click on the X at the top right hand corner of that window, or hit the ESC key on your keyboard.
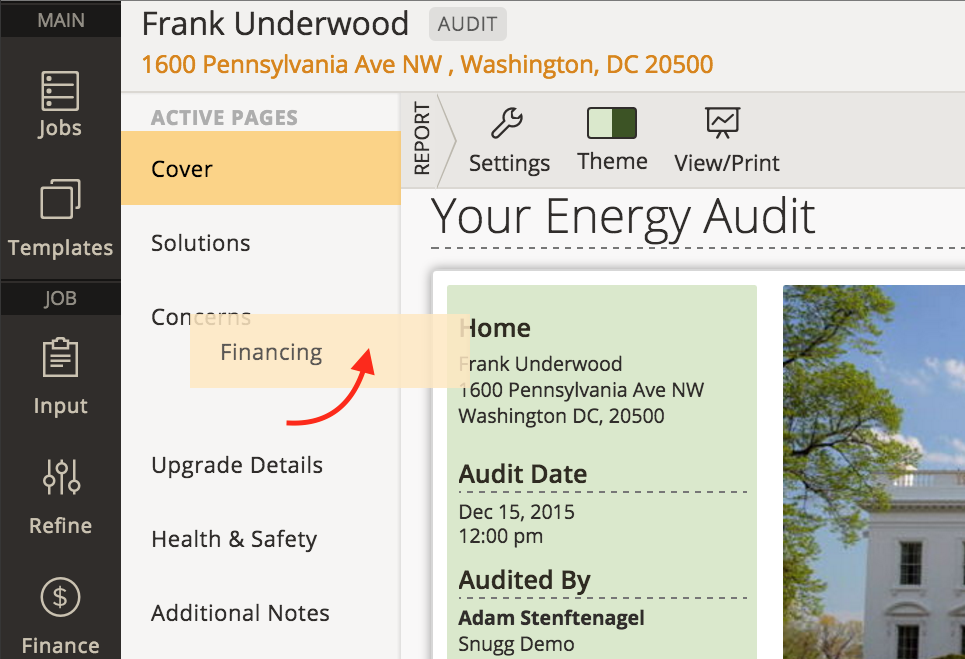
Sortable Page Elements
You can now change the order of the pages in the report. Just drag and drop the titles in the sub-navigation to create the new order:
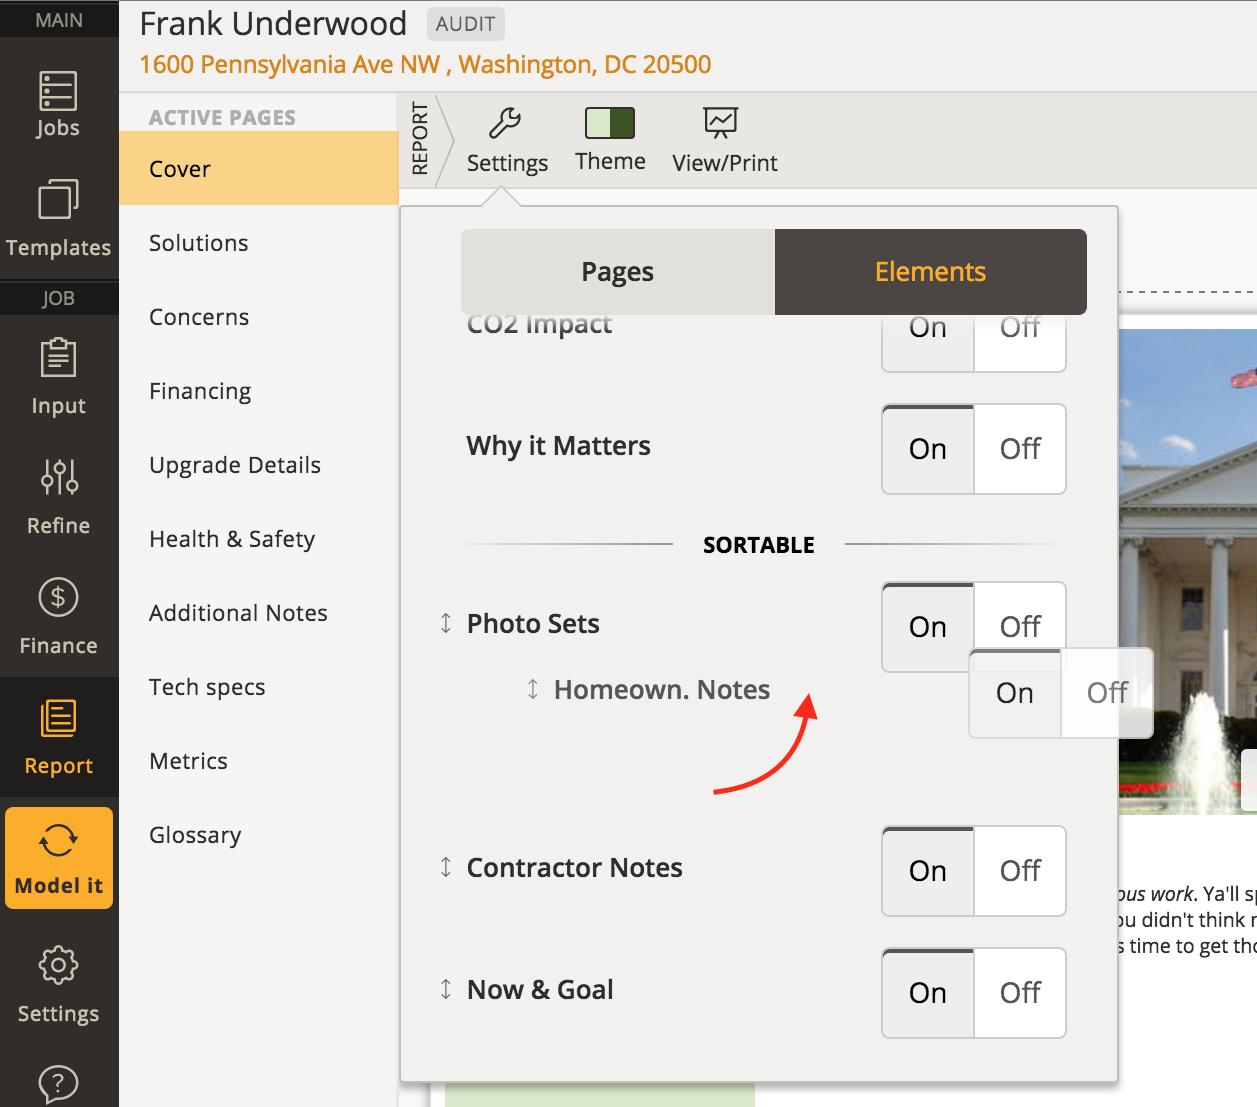
Sortable Report Pages & Elements
You can now change the order of how certain elements show up on the homeowner report. For additional notes and upgrade details, you can re-order the following four elements:
- Homeowner Notes
- Contractor notes
- Photo Sets
- Now & Goal
You can now easily drag and drop those items on the elements from the report settings popover.
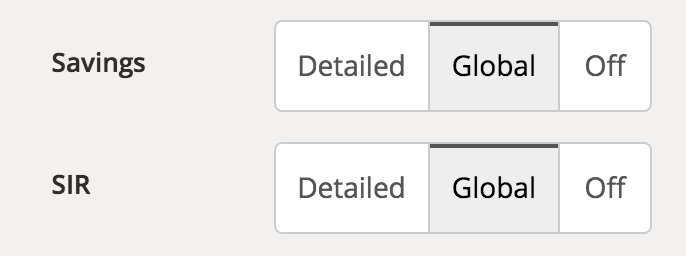
Net Savings & SIR:
You now have the ability to show total net savings numbers without also displaying the line-item savings. Previously, if you turned on the Savings element, you showed both the total savings and the line items savings for each recommendation. Many users didn’t like to show the line item savings and would then turn off the savings and SIR numbers entirely from the report
Now you can choose these three option:
- Global: Show job-level numbers
- Detailed: Show line-item level number
- Off: Show nothing
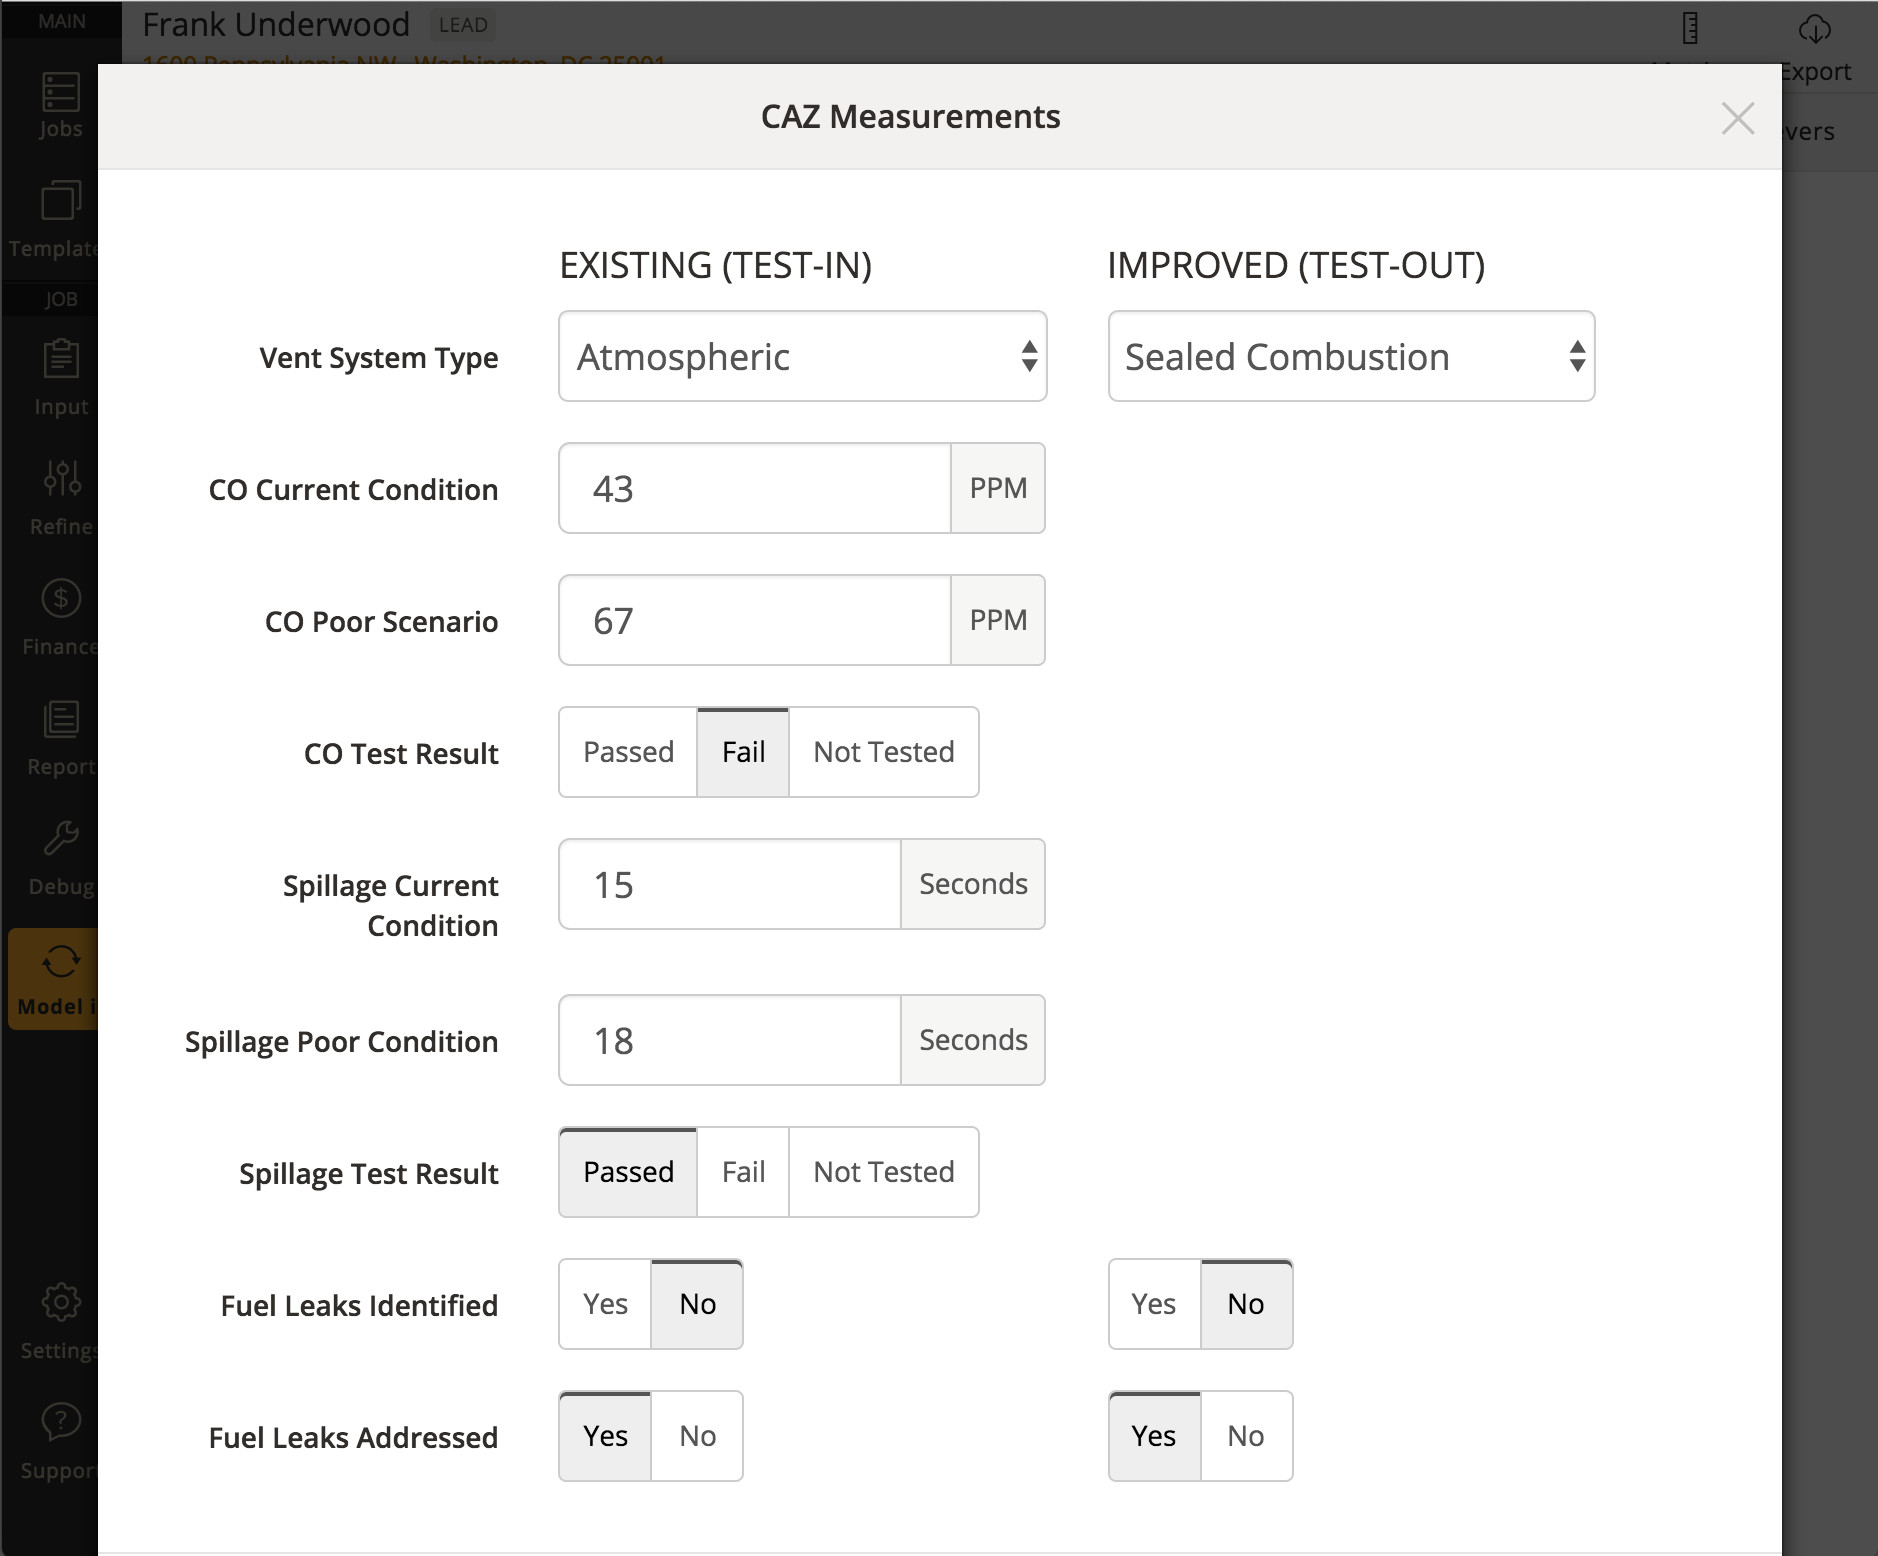
Enhanced CAZ Inputs for BPI Compliance
Detailed Combustion Appliance Zone (CAZ) inputs are now available per the BPI 1200 standard. CAZ fields DO NOT affect energy modeling and are only required for some programs. Please check with your Program Account Manager to see which of these fields are required. CAZ test results are currently not part of the report to the homeowner, but only show up in the HPXML file. We will be adding enhanced CAZ information to the report soon.
At the very bottom of the input screen, you’ll see a section for CAZ. If you have entered any combustion appliance into the inputs above that burns Natural Gas, Propane, or Fuel Oil, then that equipment will show up as an option to be added to an individual CAZ. Each CAZ can have multiple combustion appliances.
Note that a combustion appliance can only be assigned to one CAZ. In other words, you cannot assign the same water heater to two separate CAZ.
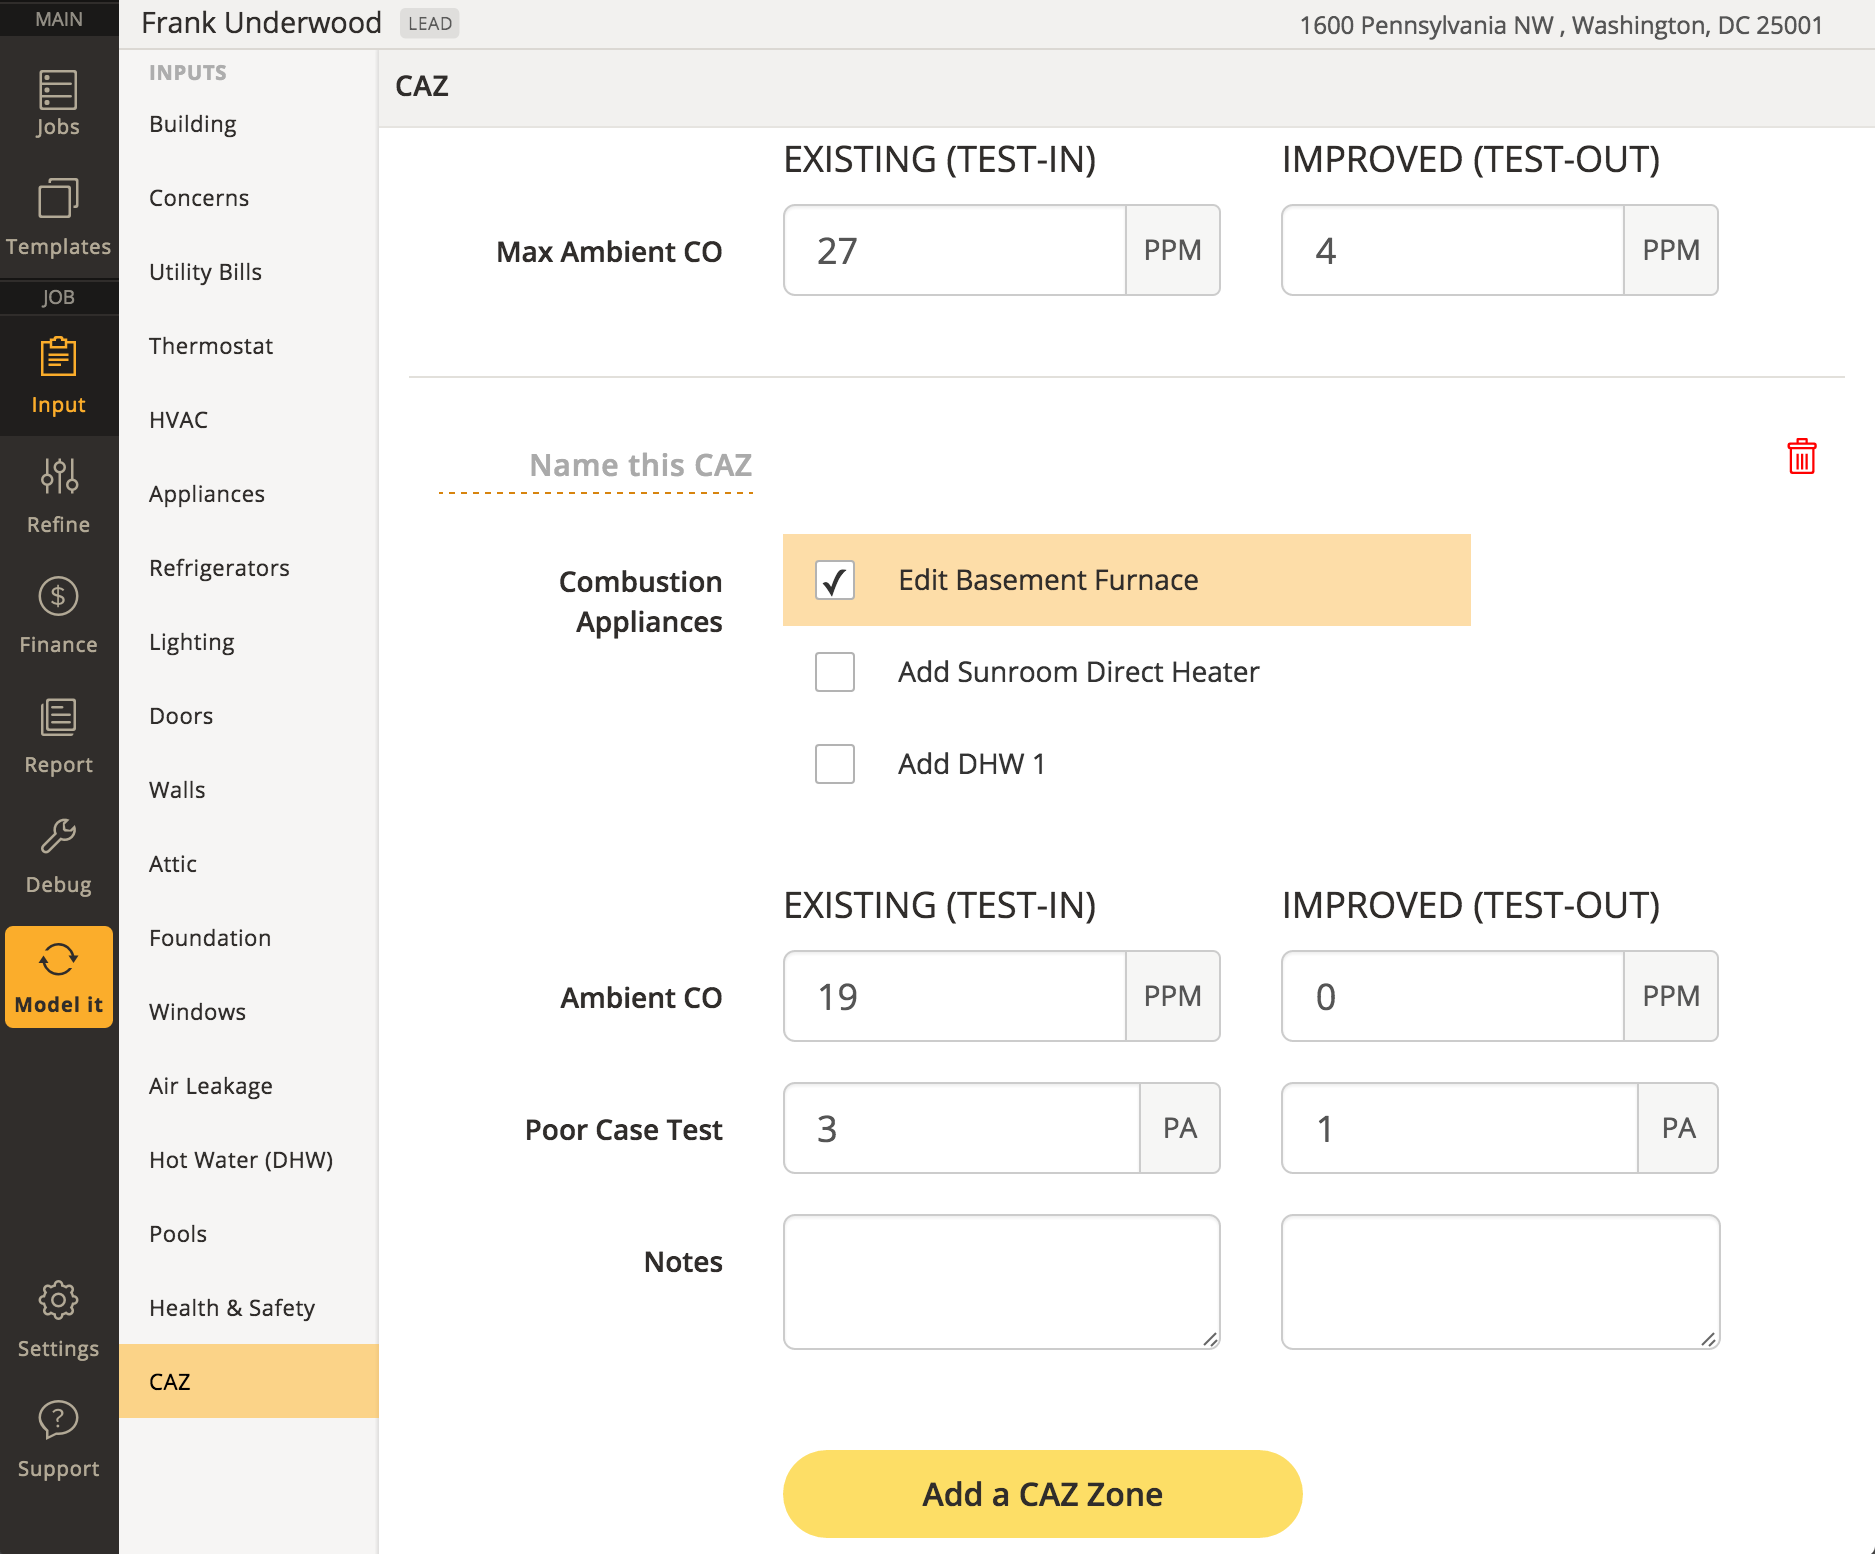
When you click on an appliance in the CAZ section, a pop-up window will open with all of the potential data fields for that specific appliance. Note: if the vent type is anything but Atmospheric, only Fuel Leak tests are required per BPI standards.
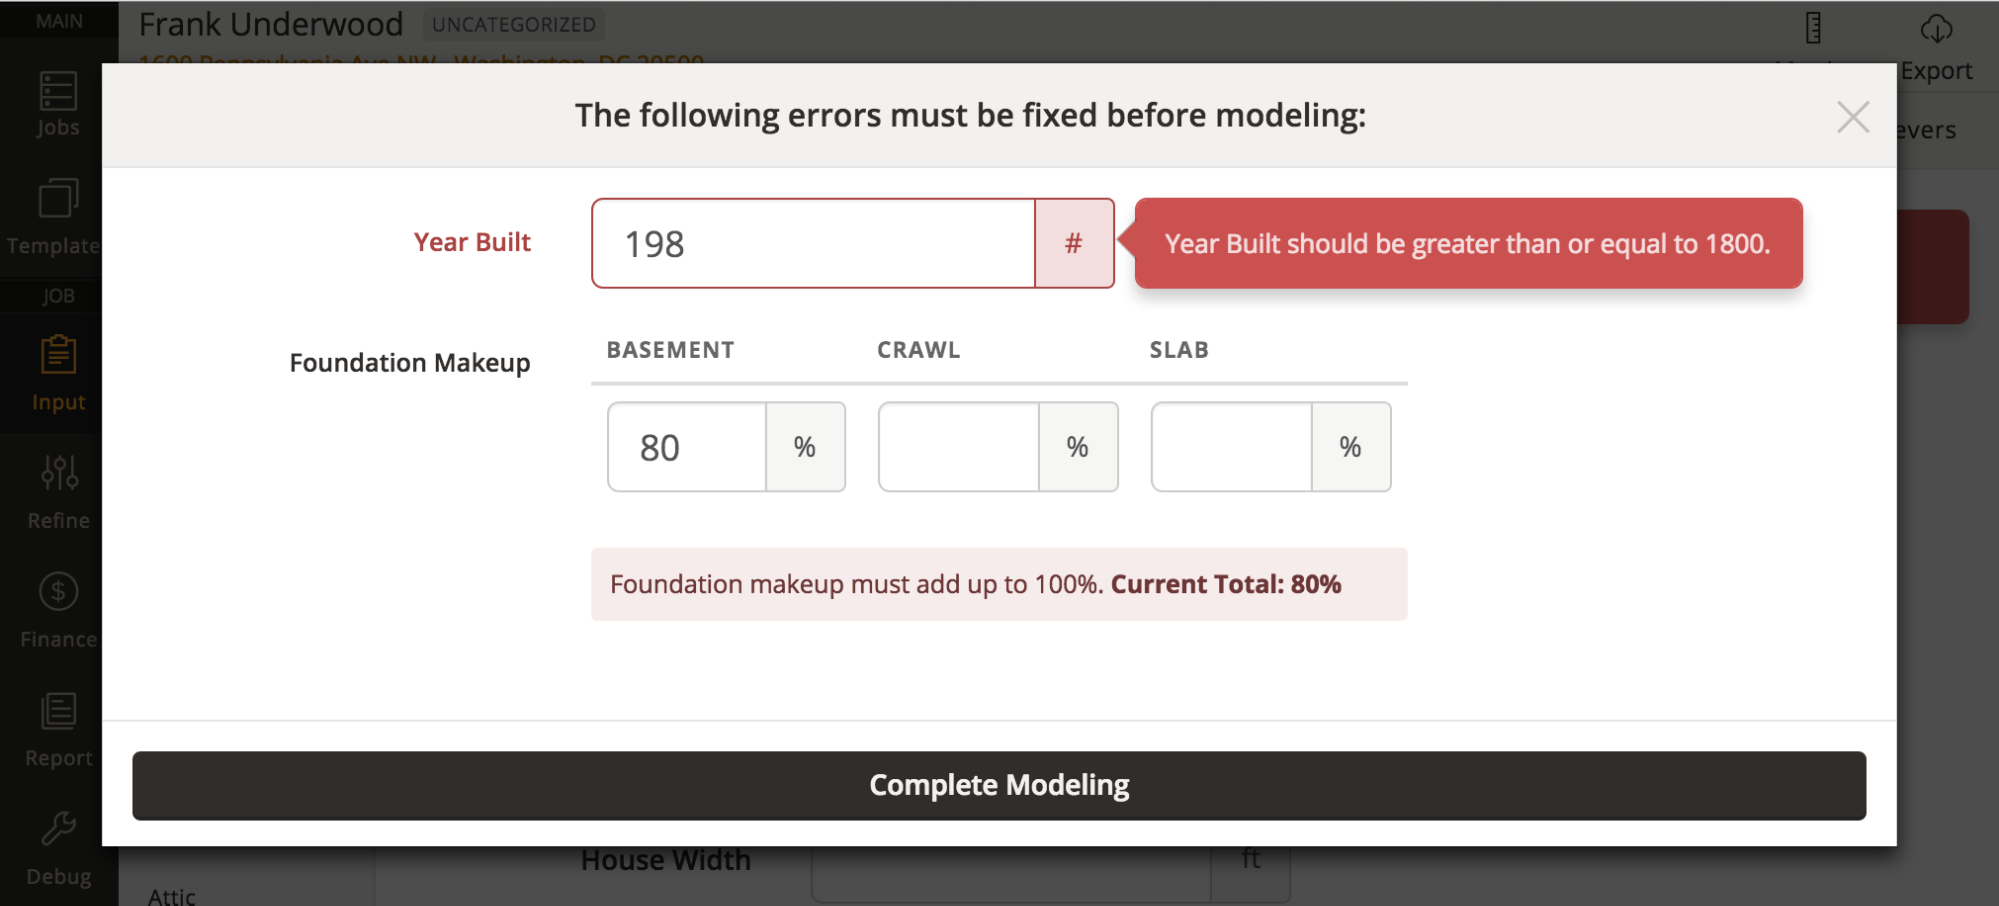
Enhanced Modeling Validation
When modeling, we now check for important fields to be filled out. Things like the Year Built being invalid or blank, foundations not adding up to 100%, heating loads not adding up to 100%, and many more will all be brought to your attention when you click the Model It button. A window will open up that contains the actual fields that need fixing. You can address those issues right there in the window and click on Complete Modeling to continue.
Better Photo Uploading
Our photo upload feature is now a lot faster. First of all, the photos are now resized before they are uploaded to our servers to help you save data on your data plan. Secondly, the photos will upload in the background so once you click on Done in the photo crop box, you can keep on working instead of waiting for the photo to finish uploading.
Improved Pagination on Report
Minor issues with page breaks in the PDF report have been fixed. Previously, some text would get lost on the report if there was a large amount of text to be displayed.
Recommendation Sort Order Stored in Templates
You can now store the sort order of recommendations in your templates. Previously, the sort order of recommendations would reset on every job.
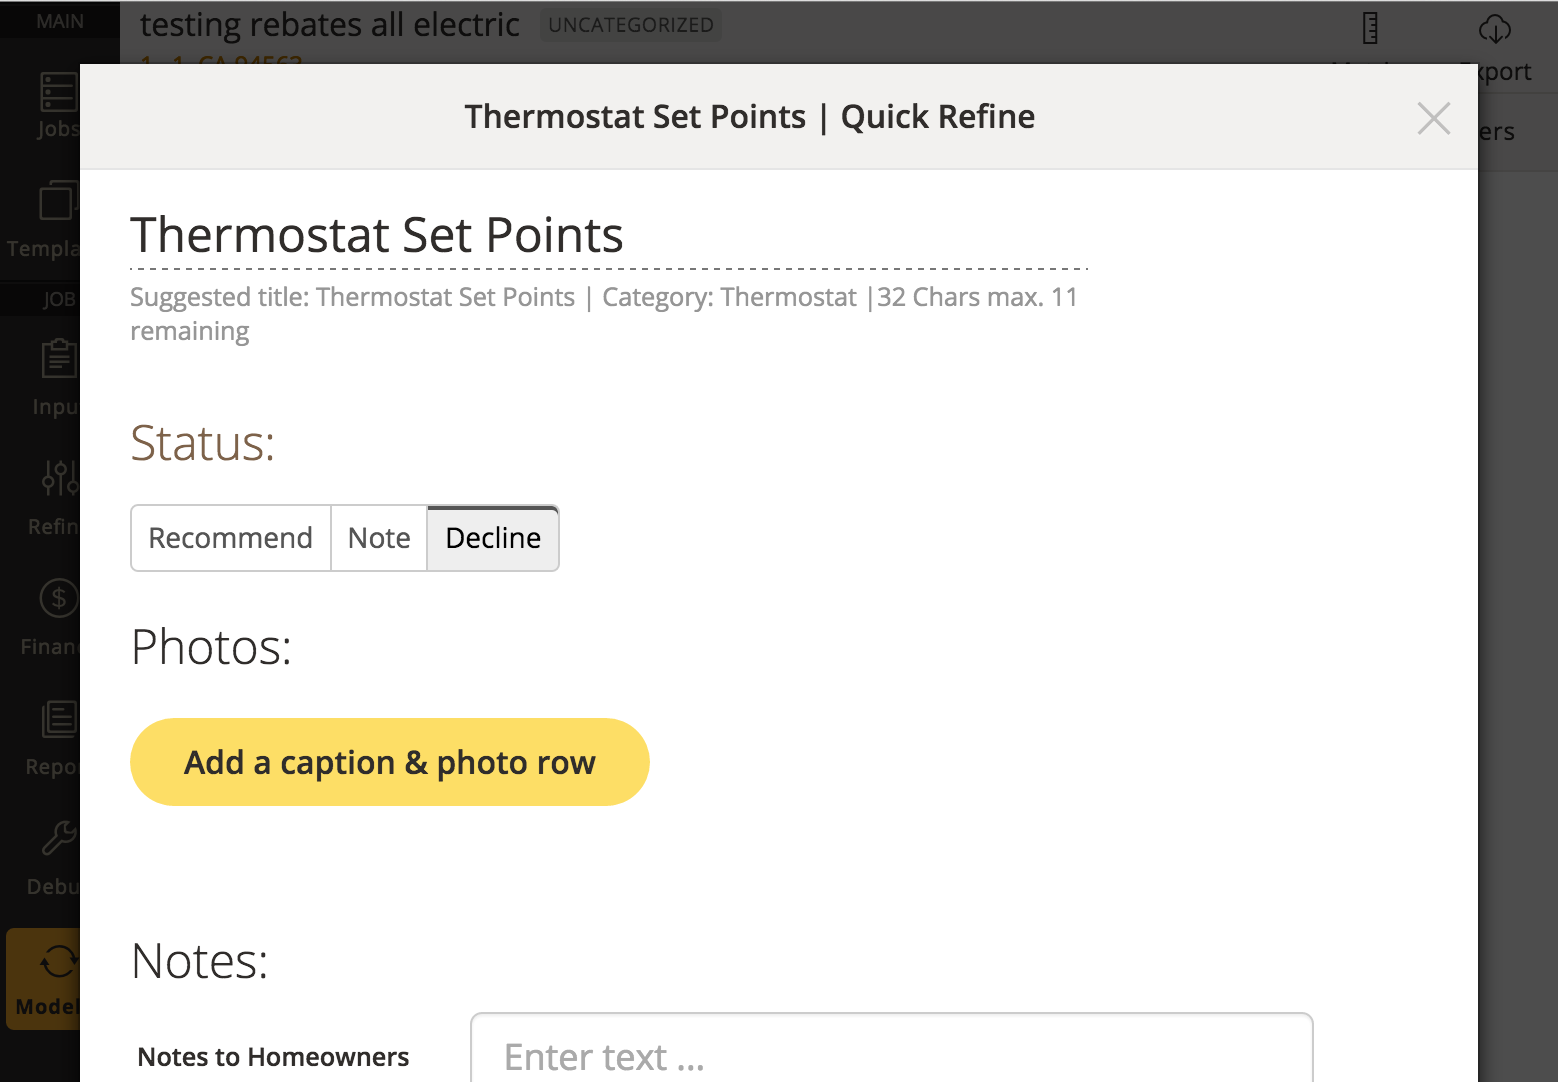
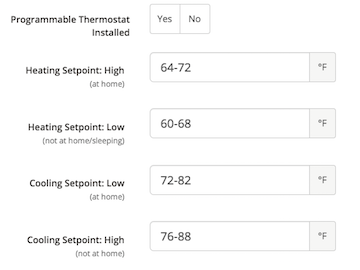
Default Thermostat Setpoint Ranges
Some of you may have taken advantage of the range feature for thermostat setpoints. Since it’s often difficult to nail down an actual setpoint that the occupants keep the house at, it’s highly beneficial to use a range of setpoints when you’re trying to get a calibrated energy model with detailed energy bills. Because of this, all new jobs that are created will have a default range of setpoints already established. It’s totally fine to override the default settings and it’s actually recommended if you have a good idea of the temperature kept in the house.
Oven Fuel Type Added for CAZ
We have added the ability to select the fuel type of the oven. This will NOT affect the energy modeling numbers for the building. It has been added so that the fuel type can be specified and tracked for CAZ testing.
About Benjamin Mailian
Ben is Head of Product and a co-founder of Snugg Home. He looks after product management, design and engineering management. Ben helps energy efficiency programs get the most out of Snugg Pro by aligning their business requirements with Snugg Pro's configuration and integration capabilities.